CVS stands for "Concurrent Versions System" and the CVS for DXSpider is held at Sourceforge. This means that it is possible to update your DXSpider installation to the latest sources by using a few simple commands. A graphical interface to CVS for Windows is explained in the next section.
Please be aware that if you update your system using CVS, it is possible that you could be running code that is very beta and not fully tested. There is a possibility that it could be unstable.
I am of course assuming that you have a machine with both DXSpider and Internet access running.
BEFORE YOU EVEN CONSIDER STARTING WITH THIS MAKE A BACKUP OF YOUR ENTIRE SPIDER TREE!!
Assuming you are connected to the Internet, you need to login to the CVS repository and then update your Spider source. There are several steps which are listed below ...
First login as the user sysop. Next you need to connect to the CVS repository. You do this with the command below ...
cvs -d:pserver:anonymous@cvs.sourceforge.net:/cvsroot/dxspider login
You will get a password prompt. Simply hit return here and your machine should return to a normal linux prompt.
What happens next depends on whether you have an existing installation that you want to update with the latest and greatest or whether you just want to see what is there and/or run it on a new machine for testing.
If you are installing Spider from CVS then change directory to /home/sysop
If you are wanting to update Spider then cd to /tmp
The next step will create a brand new 'spider' directory in your current directory.
cvs -z3 -d:pserver:anonymous@cvs.sourceforge.net:/cvsroot/dxspider co spider
This command is all on one line.
Hopefully your screen should show you downloading files. The -z3 simply compresses the download to improve speed. When this has finished, you will have exactly the same as if you had untarred a full tarball PLUS some extra directories and files that CVS needs to do the magic that it does.
Now if you are doing a new installation, that's it. Carry on as if you have just downloaded and untarred the lastest tarball.
If you want to upgrade your current installation then do this ...
tar cvfz /tmp/s.tgz spider
cd /
tar xvfzp /tmp/s.tgz
This is assuming you downloaded to the /tmp directory of course.
NOTE: the 'p' on the end of the 'xvfz' is IMPORTANT! It keeps the permissions correct. YOU WERE LOGGED IN AS THE USER SYSOP WEREN'T YOU?????
Remember to recompile the C client (cd /spider/src; make)
At this point the files have been upgraded. You can (usually) restart the cluster in your own time. However, if you attempt to use any new commands or features expect it to be fatal! At least your cluster will have been restarted then so it will be too late to worry about it!
Now the magic part! From now on when you want to update, simply connect to the Internet and then, as the user sysop ...
cd /spider
cvs -z3 update -d
and your files will be updated. As above, remember to recompile the "C" client if it has been updated (CVS will tell you) and restart if any of the perl scripts have been altered or added, again, CVS will tell you.
You will find any changes documented in the /spider/Changes file.
After the initial setup, an update to your DXSpider software is no more than a couple of clicks away. This section is intended to explain and illustrate the use of the WinCVS application to update your DXSpider software. The current stable version of WinCVS is Ver. 1.2. You can get this software at:
http://prdownloads.sourceforge.net/cvsgui/WinCvs120.zip
Pick your download mirror and then install WinCVS after the download is complete.
In this next section I have included a series of links to .jpg files to take advantage of the picture and 1000 words equivalency. The .jpg files are in the C:\spider\html directory. If someone using a Linux system is reading this section from boredom, the files are in /home/sysop/spider/html. One aside, a Linux user can also get a copy of gcvs and do your updates graphically as opposed to from the command line. The following descriptions are almost identical between WinCvs and gcvs. The following screen shots have duplicate links, depending upon whether you are viewing this information under the Windows or Linux operating system.
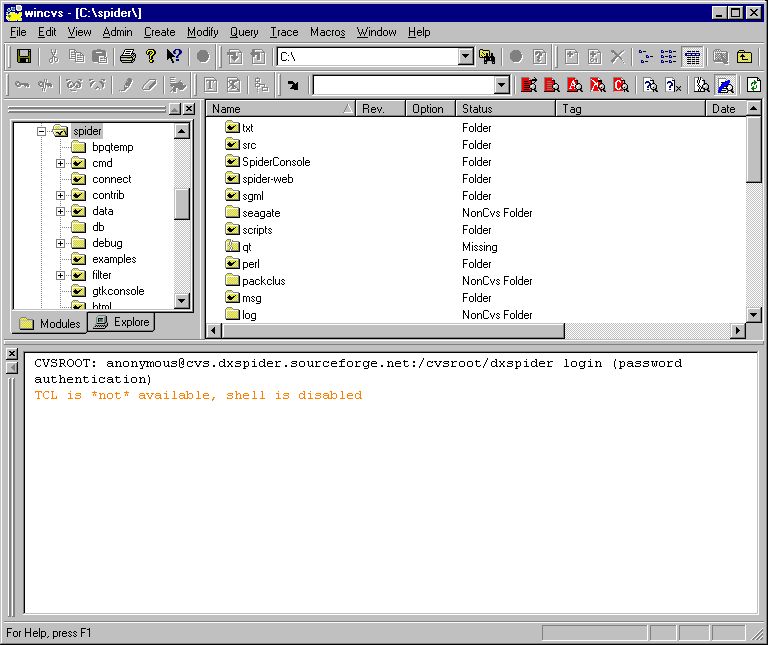
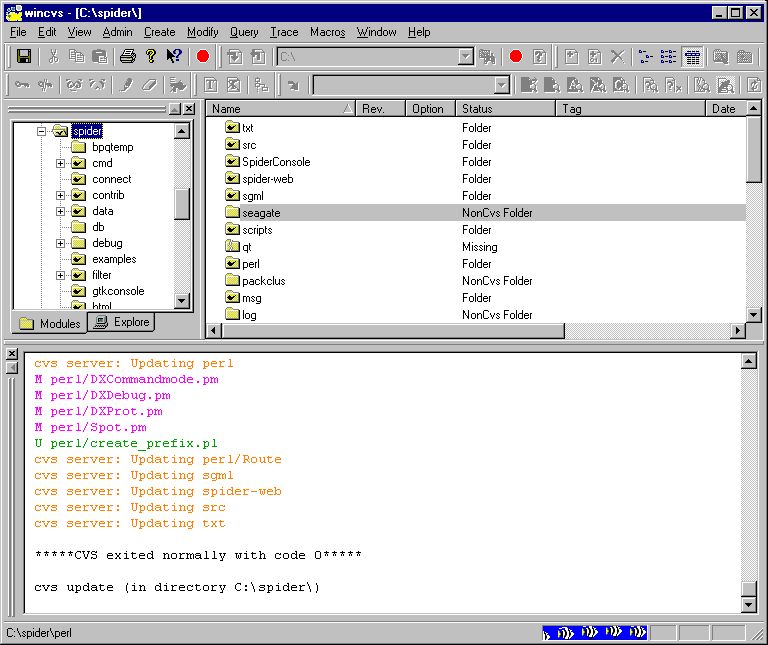
When WinCVS is installed, running, and you are connected to the internet, the initial screen looks like:
If you want, you can also look at these .jpg files with another viewer that might provide some better clarity to the image. On the left is the directory tree for your hard disk. Notice that the spider directory has a gray highlight.
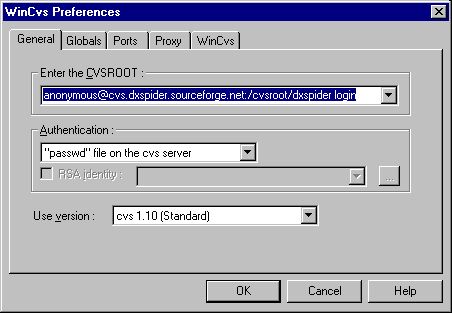
To start configuring WinCVS, click on Admin at the top of the screen and then Preferences. This should get you:
In the top line for CVSROOT, enter:
anonymous@cvs.sourceforge.net:/cvsroot/dxspider login
and select
"passwd" file on the cvs server
for Authentication on the General tab.
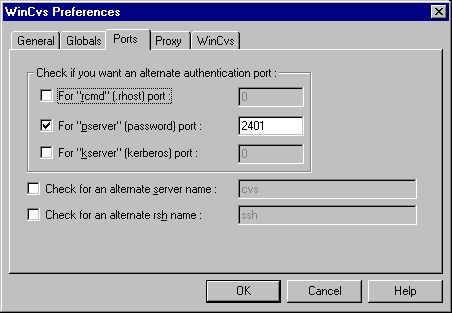
Next, move to the right to the Ports tab.
In here, check the box on the second line down for the "pserver" port. Enter a port number of 2401.
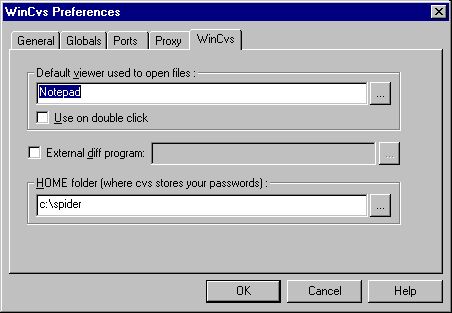
Finally, go to the WinCvs tab all the way to the right.
Enter Notepad as the viewer to open files. For the HOME folder, put "C:\spider" and click OK because the configuration is now complete.
You are now ready to upgrade your copy of DXSpider. Click on the greyed Spider folder shown in the directory tree on the left of the WinCVS display. Two things should happen. The Spider folder will be selected and the greyed-out arrow located just below the word Query in the top line will turn to solid green.
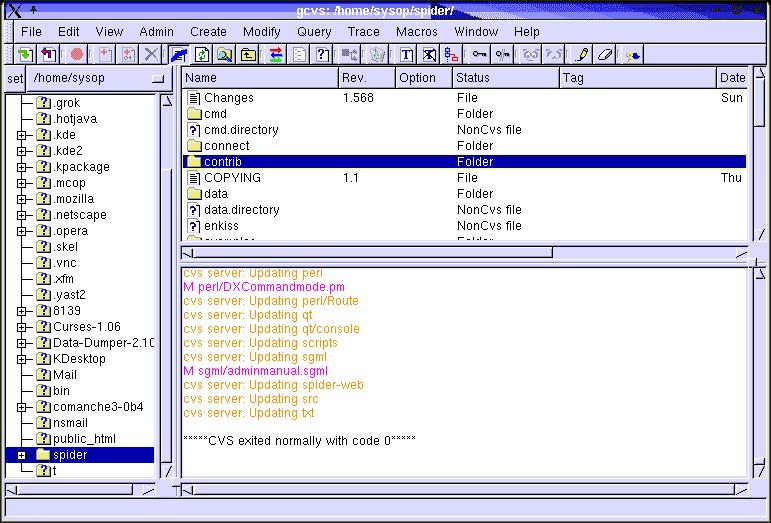
For anyone using gcvs under Linux, the green arrow is located on the extreme left of the display, under the word File. A gcvs screen looks like:
Click on the now green arrow to start the download process. An Update Settings box will be displayed to which you can simply say OK.
For future reference, the Update Settings box is the place where you can enter information to revert to a prior version of DXSpider. Information on reverting to a Before Date is contained in the WinCVS manual.
After a short period of time, a series of file names will scroll by in the lower pane of the WinCVS window. Eventually you should see
*****CVS exited normally with code 0*****
To paraphrase from the CVS section... Now the magic part! From now on when you want to update, simply connect to the Internet and start WinCVS.
Click on the greyed-out Spider directory in the left screen
Click on the green down arrow
Click OK on the Update Settings dialog box
Restart your Spider software